I've gotten a lot of questions about how I use exit slips in my classroom. This is a great use of scales from Marzano's work. I have four folders set up in my room that say "Got It," "Almost," "Kind Of," and "Nope" on them. These are the scales I have set in place for my students to use to rank their own learning and understanding of a topic. I also assign a number with each, so a 4 is Got It, 3 is Almost, etc. I explain these scales to my students when we do our first exit slip. I tell them a 4, or Got It, means that they would feel confident enough to help someone on their homework and have no troubles. A 3, or Almost, means that they pretty much get it but may have a question here or there. A 2, or Kind Of, means that they get the idea but would probably need quite a bit of help. A 1, or Nope, means they basically have no idea. Here are what my folders look like (this is from a previous school, but it's pretty much the same in my new room).
I use Exit Slips in a variety of ways, and by a variety I mean two (haha). The first way is that I give students a couple of problems they have to solve on a sticky note and when they leave they place it in the folder that they seem is appropriate for them. So say I'm teaching Solving 2-Step Equations. I'll give a problem or two that they have to solve. They'll put their name on it and if they feel really confident about it they would probably put it in the Got It folder. After class I go get them and look over them and see how they ranked themselves. (It's really useful if you have your students write their name and the scale number on their post it before they drop it in the folder. This saves you some time and sanity.)
I've used these before as bell ringers. One thing I've done is error analysis. So I'll take a student's wrong answer and post it and the class has to tell me what went wrong in their steps to solving (of course, there are no names so no one feels singled out). Another thing I've done is give them back to students a few days later and have them fix their mistakes once they've had more practice then re-evaluate themselves.
The worst thing to do is give these and never use them in your class. In the past, I've given them questions, looked at it, and then throw them away. That does nothing to show students that they are improving their learning over time.
The second way I have done exit slips is by using a general form that they fill out and drop in the appropriate folder. This is good if you don't have a lot of time left for them to work a few problems, and it gives them a chance to explain themselves as they choose their level. Here is that form:
These are pretty small little forms (I print four to a page) and take a minute to fill out. I usually give these forms out before I do the other method of giving a few problems as an exit slip. This way my students understand the scales and know how to explain their reasoning. Then when we do a few problems as a bell ringer they are more familiar with the scales and can identify where they are easier.
Exit slips are a great tool to use in your classroom to get immediate feedback from your kids. This helps when you're planning future lessons and reviewing. This will also help me out a lot this year since I'm introducing spiral math into our daily assignments so I can keep reviewing the topics they struggle with. If you would like a copy of the exit slip form, you can download it here. I hope you find them useful in your classroom. Happy teaching!
Saturday, July 23, 2016
Tuesday, July 12, 2016
Syllabus 2016-2017
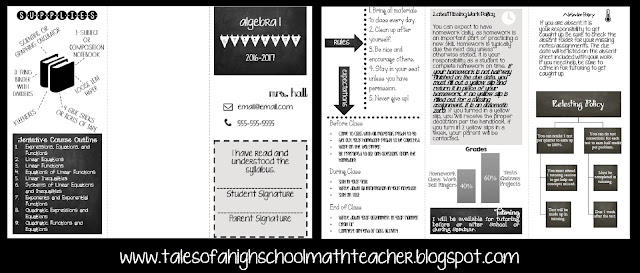
I've been working this past week on school stuff trying to get ready for the next school year to start. I'm excited, but I don't want summer to end! I think every teacher has that feeling once they see school supplies out in the aisles at Wal-Mart. I haven't been able to get into my room since our building is being destroyed improved with air conditioning (FINALLY!!), so I've been doing as much as I can at home. My laptop has definitely felt the love. One thing I always try to get done first is my syllabus. It always sets the tone for the school year and lets me hone in on my theme that I will decorate my room with. This year I've chosen chalk board and brights, which isn't too far off of what I've used for the past couple of years. Here is my syllabus! I created this in PowerPoint using a template for a brochure and then tailoring it to fit my needs. I pick a foldable style since my students put this in their notebooks. Let me know what you all think!
If you would like to download a copy to edit for yourself, you can find one here. The fonts I used will not appear, but you can download a lot of super cute ones for free from dafont.com.
If you would like to download a copy to edit for yourself, you can find one here. The fonts I used will not appear, but you can download a lot of super cute ones for free from dafont.com.
Subscribe to:
Posts (Atom)


.jpg)
