Wednesday, September 14, 2016

Grading Organization

I get asked all the time how I organize my papers that come in and out to grade. I've done a number of things over the years, but this is probably my favorite system ever now.

Over the summer I hosted a Thirty-One bag party and got all kinds of cool stuff from it. One of the things I got was a Fold-N-File. I absolutely love this thing. I think I'm more organized than I was before because of this system.

Here's what it looks like in general (taken from the Thirty-One Catalog):
Super cute, right? I chose the Black Twill Stripe because it fit my classroom theme. I set it on my desk so it's easily accessible.

On the front I attached a calendar. I found this at the Dollar Tree around back-to-school time. I just hooked it around the opening with a binder ring.

Inside the Fold-N-File, I have a different hanging folder for each class that I teach.
 In each hanging folder is two folders for each class: an "In" and "Out" folder. I put work that needs to be graded in the "In" folder and then put it in the "Out" folder as a I grade it.


When I'm ready to hand back papers, I just grab the "Out" folder for that class and start passing out. It's really easy and works well for me. This is also nice to have because it fits nicely in most of the Thirty-One organizing totes so you can just grab the whole thing and take it home if you need to.

I love this. If you've always been trying to find a way to handle the paper clutter, this is definitely something to invest in. It will save from the piles of papers spread out everywhere.

Happy teaching!

Sunday, September 11, 2016

Classroom 2016-2017

I've finally gotten some time to dedicate to blogging today. The Chiefs are killing me, so I thought I would focus my energy elsewhere. I bring you my classroom this year! Over the summer, our building went through some major upgrades - we got air conditioning!!!! I can't believe it. You never realize how much you take it for granted until you don't have it. Because of the amount of work that had to be done, we pretty much had to pack up our classrooms and say adios until around the week before school started. I got the itch to paint my classroom to give it a fresh new look. This is one of my favorite classrooms I've had so far. It's so colorful and fun. I can't wait to hear what you guys think!

Here is what you see from the hallway. I love this little bulletin board idea. I saw a variety of these bulletin boards on Pinterest and created my own to fit my theme.


Here's the inside of the door. Again, another Pinterest idea.


This is what you see when you come in to my room. Someone said it looks like a party in here. It is a party -- a math party! Ok, that's probably lame. But, I don't like boring classrooms. I like my room to welcoming and inviting.


I love the fact that I have tables this year. They work so much better for my style of teaching. I also love the little trash cans on each table. I picked these up at the Dollar Tree, 2 for $1. In each supply caddy, there are scissors, markers, colored pencils, calculators, and glue. We use these for interactive notebooking.

Here are a few more views from the door.


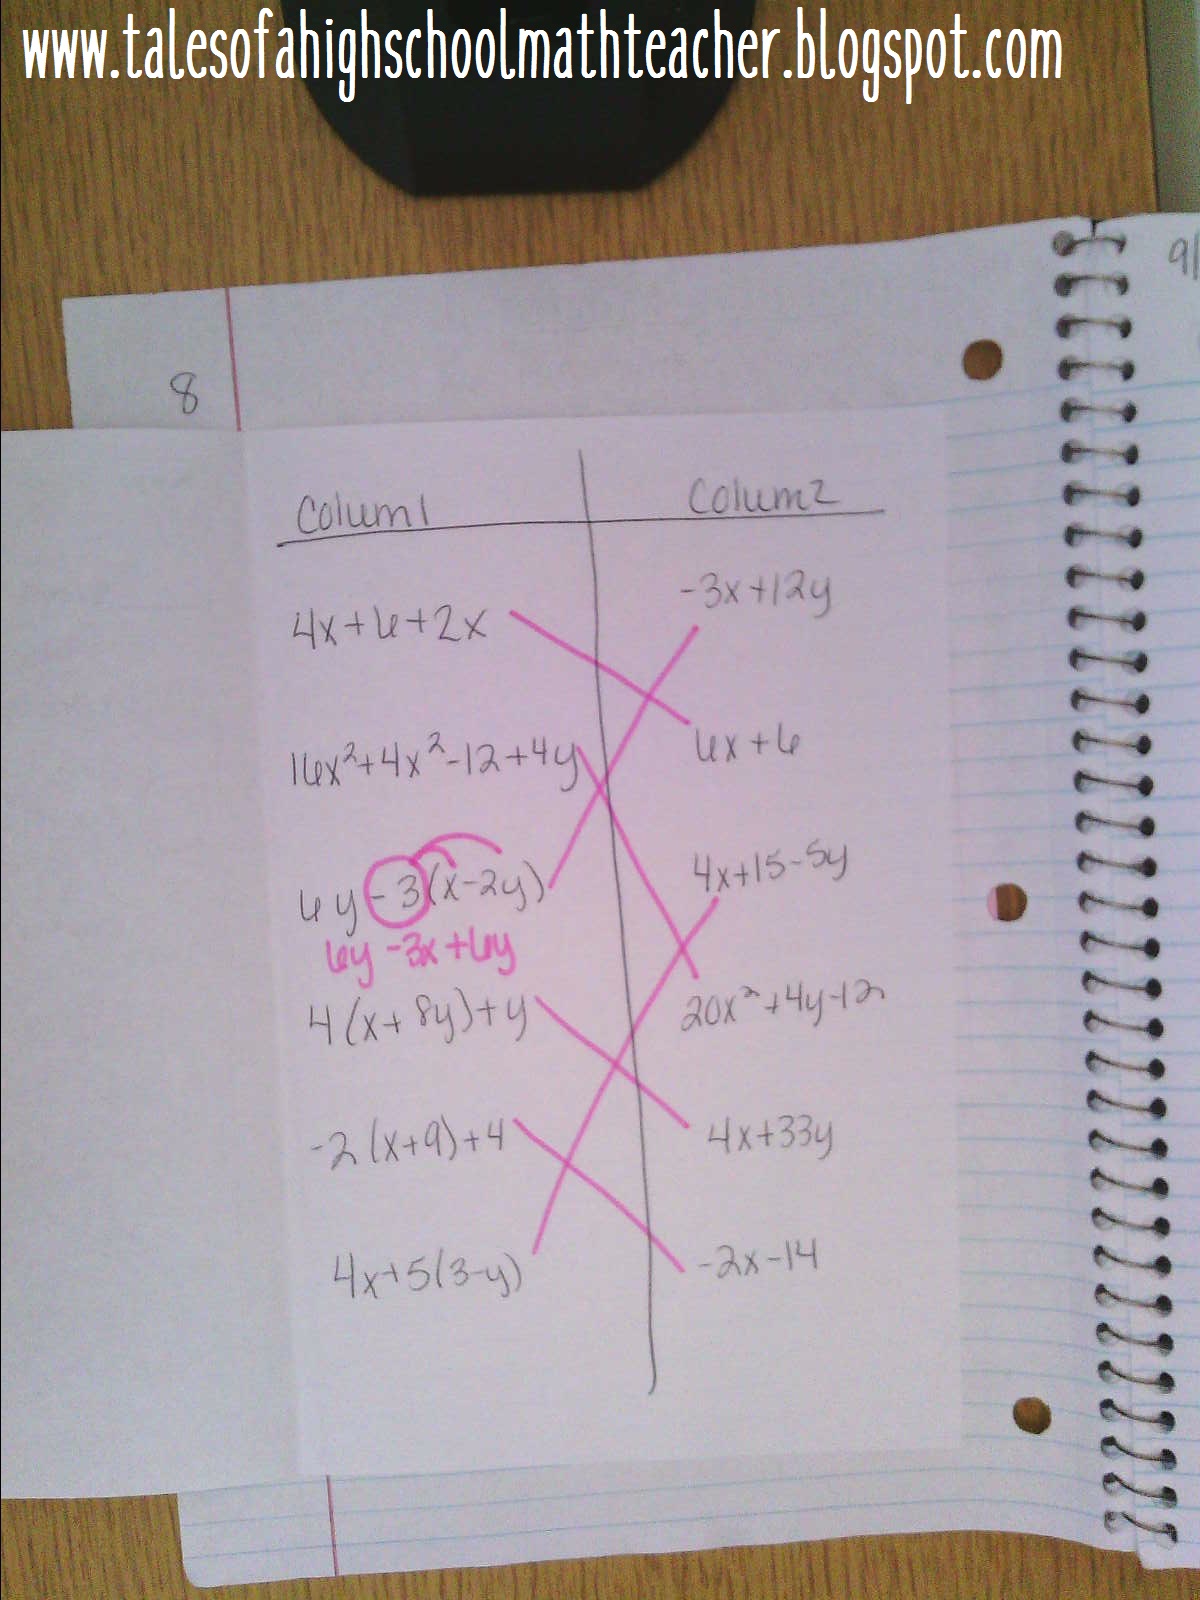
Here is my Request to Retest, Yellow Slip, and Absent bulletin board. There is a blogpost about those here.


Here is my supplied cabinet. Nothing fancy.


Here is where my students keep their binders and some extra supplies for them. My Exit Slip folders are also located here. There is a blogpost here about those.


Then we move to the front of the room where my Smart Board is located. I moved it here this year to reduce the amount of glare from the windows. I am super happy with this decision.


Off to the side of my Smart Board is my little document camera area. With interactive notebooking, I use my document camera every single day. I keep my class notebooks here and my supplies that I need for my notebook.This year I snagged an AV cart and I love this! It is just big enough to hold everything AND it's on wheels so I can move it if I need to. Great decision! Back here is also my Data Wall. You can find more information about that here.


Then there is my whiteboard. I use this to write the lesson for the day (top box), the "I Can" statement (middle box), and Assignment (bottom box). Students come in and see this and know what to expect for the day. To create this, I used Washi Tape. I also made the class banners in PowerPoint using the font KG A Little Swag (download at dafont.com).


Last is my little desk area. Behind my desk is two bookshelves that have my curriculum binders for each class and extra little binders I have for odds and ends (PBS, CTA, Sub Folder, etc.). I also have my calendar bulletin board with all of my team pictures on it, and my PBS information bulletin board. The little table is kind of my catch all table. 


I gave my desk a makeover while I painted my room. I painted the top in white chalk paint and the used chevron contact paper I got from Wal-Mart to cover the metal. I LOVE how this turned out. My desk was old and ugly and gross. Now, it's the thing that dreams are made of. Ok, that was probably extreme. But I love it. Those little bulletin boards above my computer are adorable. I got the cork boards in a 4-pack from and four different colors of fat quarters from Wal-Mart and stapled the fabric onto the cork boards. These added a little something to that area that would otherwise be blank.


I made this little tissue paper garland using some instructions I found on Pinterest. On my desk is my Fold N File I got from Thirty-One over the summer. I'll blog about this soon.

Whew! I'm tired just from blogging about this room. I really do love how it turned out, though. My kids love it, my coworkers love it, I love it...

We're already about 4 weeks into the school year and so many great things have happened in this room thus far. I can't wait to share more with you! Happy teaching!

Tuesday, August 23, 2016

First Day Activity: Saran Wrap Balls

The first day has came and went, and overall it was a successful day! I think they kids this year are going to be great (with a few exceptions, but that's always the case and I think we will learn a lot.

This year for my ice breakers, I wanted to do something engaging and fast-paced that all students would enjoy. I came across saran wrap balls on Pinterest one time and thought about how much fun that would be to incorporate into my class. Thus, my plan was set!

Unfortunately I did not take pics of the process of making the saran wrap balls, but it really is pretty simple. Here's what you need:

 A bunch of candy (I used probably about 50 or so pieces per class)
Saran Wrap (I got 2 rolls that worked for 5 classes)
Packing tape
Anything else you want to give as prizes (I just used candy since I teach high school)

Pick some candy and start wrapping. I would wrap about 5 or so pieces per strip, cut it, tape it with packing tape (adds a challenging factor), and then start again. I would say that the end result was a ball about the size of a child's size basketball (those smaller ones used for Little Tyke basketball goals).

Here's how you play:
  1. Give a student the ball and the student right next to them 2 dice.
  2. When you say go, the student with the ball can start unwrapping. Whatever falls out is his/hers.
  3. While the one is unwrapping the ball, the student next to him/her is rolling the 2 dice.
  4. When doubles is rolled, the student who rolled gets to take the ball and start unwrapping it.
  5. The next student starts rolling dice until they get doubles.
  6. Continue around the circle until the ball is gone.
I only had 2 rules. They could not cut/rip through the saran wrap unless it was to get passed tape. They also had to leave their candy alone until the end.

It's that easy! Kids LOVED this. Some even said that we could do this without candy and they would still love it (doubt that, but maybe).

Here are a few pictures from one of my classes. It worked really well with my new tables this year :).


If you try this, let me know how it works out for you in the comments! Happy teaching!

Saturday, July 23, 2016

Exit Slips

I've gotten a lot of questions about how I use exit slips in my classroom. This is a great use of scales from Marzano's work. I have four folders set up in my room that say "Got It," "Almost," "Kind Of," and "Nope" on them. These are the scales I have set in place for my students to use to rank their own learning and understanding of a topic. I also assign a number with each, so a 4 is Got It, 3 is Almost, etc. I explain these scales to my students when we do our first exit slip. I tell them a 4, or Got It, means that they would feel confident enough to help someone on their homework and have no troubles. A 3, or Almost, means that they pretty much get it but may have a question here or there. A 2, or Kind Of, means that they get the idea but would probably need quite a bit of help. A 1, or Nope, means they basically have no idea. Here are what my folders look like (this is from a previous school, but it's pretty much the same in my new room).


I use Exit Slips in a variety of ways, and by a variety I mean two (haha). The first way is that I give students a couple of problems they have to solve on a sticky note and when they leave they place it in the folder that they seem is appropriate for them. So say I'm teaching Solving 2-Step Equations. I'll give a problem or two that they have to solve. They'll put their name on it and if they feel really confident about it they would probably put it in the Got It folder. After class I go get them and look over them and see how they ranked themselves. (It's really useful if you have your students write their name and the scale number on their post it before they drop it in the folder. This saves you some time and sanity.)

I've used these before as bell ringers. One thing I've done is error analysis. So I'll take a student's wrong answer and post it and the class has to tell me what went wrong in their steps to solving (of course, there are no names so no one feels singled out). Another thing I've done is give them back to students a few days later and have them fix their mistakes once they've had more practice then re-evaluate themselves.

The worst thing to do is give these and never use them in your class. In the past, I've given them questions, looked at it, and then throw them away. That does nothing to show students that they are improving their learning over time.

The second way I have done exit slips is by using a general form that they fill out and drop in the appropriate folder. This is good if you don't have a lot of time left for them to work a few problems, and it gives them a chance to explain themselves as they choose their level. Here is that form:

These are pretty small little forms (I print four to a page) and take a minute to fill out. I usually give these forms out before I do the other method of giving a few problems as an exit slip. This way my students understand the scales and know how to explain their reasoning. Then when we do a few problems as a bell ringer they are more familiar with the scales and can identify where they are easier.

Exit slips are a great tool to use in your classroom to get immediate feedback from your kids. This helps when you're planning future lessons and reviewing. This will also help me out a lot this year since I'm introducing spiral math into our daily assignments so I can keep reviewing the topics they struggle with. If you would like a copy of the exit slip form, you can download it here. I hope you find them useful in your classroom. Happy teaching!

Tuesday, July 12, 2016

Syllabus 2016-2017

I've been working this past week on school stuff trying to get ready for the next school year to start. I'm excited, but I don't want summer to end! I think every teacher has that feeling once they see school supplies out in the aisles at Wal-Mart. I haven't been able to get into my room since our building is being destroyed improved with air conditioning (FINALLY!!), so I've been doing as much as I can at home. My laptop has definitely felt the love. One thing I always try to get done first is my syllabus. It always sets the tone for the school year and lets me hone in on my theme that I will decorate my room with. This year I've chosen chalk board and brights, which isn't too far off of what I've used for the past couple of years. Here is my syllabus! I created this in PowerPoint using a template for a brochure and then tailoring it to fit my needs. I pick a foldable style since my students put this in their notebooks. Let me know what you all think!


If you would like to download a copy to edit for yourself, you can find one here. The fonts I used will not appear, but you can download a lot of super cute ones for free from dafont.com.

Tuesday, June 28, 2016

Solving Equations

This is one of my favorite things to teach. This is the basis of Algebra. I tell my kids all the time...if you can solve an equation, you can do anything. This year I didn't have to get as in-depth with solving equations because my Algebra I and Algebra II students were pretty good at doing it already. SCORE!

Since they pretty much were ok with basic equations, we skimmed it and jumped right in to more difficult equations. These foldables I got from Sarah at Math=Love.


I really liked the multi-step equations foldable. It was pretty straight forward and easy to follow. If my students got stuck, I'd have them go look at this foldable and tell me what all they've checked for and what they need to do next. Eventually they quit asking. 

Absolute value equations came next. What I used isn't a foldable, but I think this was pretty effective.
 Percent of change. All they really needed in order to do this was a formula. I have a binder full of pre-printed foldables and notetaking items, so I used these little clipboards for the formula. We just did a worksheet together on the other page for our guided practice.
 Proportions were next. We talked about what proportions were and how we can solve for an unknown variable in a proportion using cross multiplication. I actually tell my students we "butterfly multiply" because it makes a cute little butterfly, and they seem to remember that more than a lot of things.
Solving literal equations...this is kind of a challenge for a lot of students. Maybe the name of it alone makes it intimidating...I'm not sure. I made this little flow chart foldable that seemed to help students slow down and think about the process. We then practiced with a bunch of different formulas.


I've done all kinds of activities to enforce these ideas. I have scavenger hunts, Bingo, grid games, so on that I use both as practice and as review throughout the year. I love equations. I hope you find this stuff useful for you. Happy teaching!

Friday, June 24, 2016

Variables, Expressions, Properties, and Functions

It's been a while! I'm going to continue sharing some ideas from my interactive notebooks I used this past school year. I'm going to shift from geometry and take a look at my Algebra I notebooks. I also use a lot of these for Algebra 2 as well. I feel like my Algebra I notebooks have a little more creativity than the others because that is pretty much the only thing I taught 2 years ago. I'm working on beefing up all of my activities and foldables next year, but I'm mainly going to focus on my other classes.

Anyways...we start out Algebra I talking about variables, expressions, properties of numbers, order of operations, and relations and functions.
I like this graphic organizer a lot because they can see all of the words and all of the operations right there. Before we take notes, I divide them up into groups and have them brainstorm words that mean a certain operation. I give each group their own operation. We then come back together and they'll share their ideas and I'll have others chime in anything else they can think of. They normally get close to all of them.

 This is the activity I have them do with translating phrases to expressions. It's a little too easy, so I may try something more difficult next year.


When we talk about order of operations and evaluating expressions, I like this activity a lot. I give groups of students a deck of cards and they draw cards to assign each variable a value. Black cards are positive integers and red cards are negative integers. They then evaluate each expression using those values and they have me check each one before they can move on. The formulas sheet is something I just got off the internet with a bunch of formulas on it. I actually only gave that part to my Algebra 2 students, but I think my Algebra I students would benefit from it also.

 Properties of numbers. It's pretty simple. I got this foldable from Sarah at Math=Love. The link to her blog is on the right bar under "Blogs I Love." She's awesome and has a lot of great ideas.
 

 Next we talk about the different parts of an expression and how to simplify expressions. We then do the activity below.

They identify parts of expressions first and then match expressions to their simplified form.


 Next is relations. This circle actually folds up into a triangle. We discuss the different ways to express a relation and give examples of each. We then do the partner activity with a deck of cards. The directions are in the picture. I get very picky with this, especially with the mapping diagram and graph. Mine tend to not put arrows on mapping diagrams and then connect the points on the graphs. So when I check their work, I always make sure they do this part correctly and explain to them why we draw arrows and why we don't connect points.


Sorry these are so crooked! We then shift from relations and talk about functions. This is something I really need to start beating into their heads and never stop until they graduate. It drives me crazy that they can't ever remember the definition of a function! With this lesson we do a card sort activity. I could have sworn I took a picture of the finished card sort but I can't find it anywhere! I give students a sheet with a bunch of random relations, mapping diagrams, graphs, and tables and they have to cut them out and sort them out. I like this activity a lot, but it's pretty time consuming with all the cutting and gluing. Next year I think I'm just going to do envelopes to skip all the gluing.

Last in this post is interpreting graphs of functions. We talk about intercepts, symmetry, etc. I think this lesson is kind of out of place. Yeah, it goes with functions. But we only talk about linear functions until Unit 8, so I may move this lesson to coincide with quadratics. 

I hope you find some of this useful for you! I'm open to any suggestions you may have, just leave me a comment below! Happy teaching!