

Basic Geometry Definitions


The next lesson we did was about distance and midpoint. I gave students the formulas to write in their notebooks and we did an activity to practice. For the activity, I made a copy of the school map and drew a coordinate plane on it. I had students map out their schedules for the day. They then had to find the distance and midpoints between each of their classes during the day. We acted like birds and "flew" over the walls so we didn't have to worry about going through walls and all that. This project took a couple of days, but they got a lot of practice with the distance and midpoint formulas. One thing I learned from doing this is that my kids didn't remember that squaring a negative number results in a positive number, so I had some issues with the distance formula. Overall, I think this was a good activity.
Distance and Midpoint


I wish I would have taken pics of what the students' work looked like. They did a good job with this and really took their time on it.
Our next lesson was over basic angle relationships, another integral part of geometry. First, we defined what angles are and how they are made, which seems pretty obvious knowledge but you would be surprised. We then talked about how to name angles, which you can see in this foldable.
Angles and Angle Relationships


Next, we defined the basic angle relationships: angle bisector, congruent angles, right angles, acute/obtuse angles, vertical angles, complimentary angles, supplementary angles, adjacent
angles, linear pair, and perpendicular angles. The first sheet is
something I made. The second is a foldable I found for free on Teachers
Pay Teachers here. It worked for what I needed it to. I think next year I'll tweak it a little and add linear pair and perpendicular angles to it just so everything fits in one foldable. Since there are so many different angle relationships, I broke this into a 2-day lesson.


The last basic geometry lesson we did was over 2-D and 3-D shapes. They learn about this in middle school, but as I've learned you can't ever assume they remember it. We went over the formulas for the 2-D shapes and practiced using them.
2-D and 3-D Shapes

For 3-D shapes, I decided to do a little more than just give them the formulas and we practice and move on. I like doing projects, so I figured why not do one for this? I assigned each student a 3-D shape and had them present the following: the net, the shape, the number of edges and vertices, the volume formula, the surface area formula, and examples of how to use each.
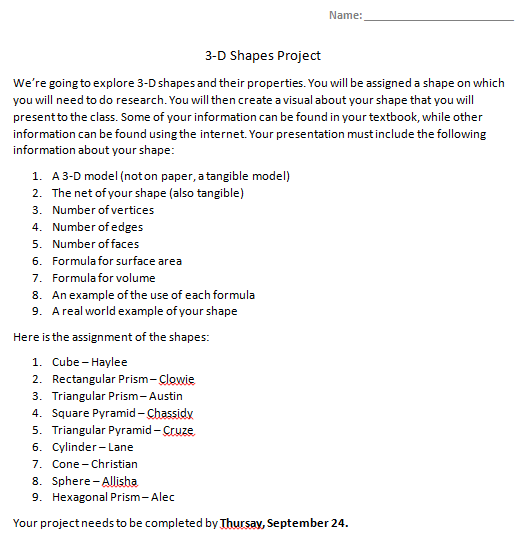

Since the net and shape had to be tangible, I made a mobile out of them and hung them in my room. Next year, I'm going to make this a requirement when presenting their project. While they presented, the rest of the students were given this sheet and had to copy down the information being presented to them.

Here are the mobiles that I made from their work.


If this is the first time you're visiting my blog and you're curious as to how my notebooks work, follow the links below and you can see how my notebooks are set up!
ISN Set-Ups 2015-2016
ISN Set-Ups
I hope you find some use in your classes from these ideas. Feel free to leave comments about how these lessons went for you or if you have any suggestions I'd love to hear them. Happy teaching!


.jpg)

Dissertation Writing Services is a professional academic support platform dedicated to helping students and researchers achieve success in their dissertations, theses, and research projects. With a team of PhD-qualified experts across diverse disciplines, the service offers tailored guidance in research design, literature reviews, methodology, data analysis, editing, and formatting. Known for its focus on originality, timely delivery, and confidentiality, Dissertation Writing Services has supported students from leading universities in the UK, USA, Canada, Australia, and Europe. The platform’s mission is to provide reliable academic assistance that empowers learners to excel in their academic journeys.
ReplyDeleteमहाकालसंहिता कामकलाकाली खण्ड पटल १५ - ameya jaywant narvekar कामकलाकाल्याः प्राणायुताक्षरी मन्त्रः
ReplyDeleteओं ऐं ह्रीं श्रीं ह्रीं क्लीं हूं छूीं स्त्रीं फ्रें क्रों क्षौं आं स्फों स्वाहा कामकलाकालि, ह्रीं क्रीं ह्रीं ह्रीं ह्रीं हूं हूं ह्रीं ह्रीं ह्रीं क्रीं क्रीं क्रीं ठः ठः दक्षिणकालिके, ऐं क्रीं ह्रीं हूं स्त्री फ्रे स्त्रीं ख भद्रकालि हूं हूं फट् फट् नमः स्वाहा भद्रकालि ओं ह्रीं ह्रीं हूं हूं भगवति श्मशानकालि नरकङ्कालमालाधारिणि ह्रीं क्रीं कुणपभोजिनि फ्रें फ्रें स्वाहा श्मशानकालि क्रीं हूं ह्रीं स्त्रीं श्रीं क्लीं फट् स्वाहा कालकालि, ओं फ्रें सिद्धिकरालि ह्रीं ह्रीं हूं स्त्रीं फ्रें नमः स्वाहा गुह्यकालि, ओं ओं हूं ह्रीं फ्रें छ्रीं स्त्रीं श्रीं क्रों नमो धनकाल्यै विकरालरूपिणि धनं देहि देहि दापय दापय क्षं क्षां क्षिं क्षीं क्षं क्षं क्षं क्षं क्ष्लं क्ष क्ष क्ष क्ष क्षः क्रों क्रोः आं ह्रीं ह्रीं हूं हूं नमो नमः फट् स्वाहा धनकालिके, ओं ऐं क्लीं ह्रीं हूं सिद्धिकाल्यै नमः सिद्धिकालि, ह्रीं चण्डाट्टहासनि जगद्ग्रसनकारिणि नरमुण्डमालिनि चण्डकालिके क्लीं श्रीं हूं फ्रें स्त्रीं छ्रीं फट् फट् स्वाहा चण्डकालिके नमः कमलवासिन्यै स्वाहालक्ष्मि ओं श्रीं ह्रीं श्रीं कमले कमलालये प्रसीद प्रसीद श्रीं ह्रीं श्री महालक्ष्म्यै नमः महालक्ष्मि, ह्रीं नमो भगवति माहेश्वरि अन्नपूर्णे स्वाहा अन्नपूर्णे, ओं ह्रीं हूं उत्तिष्ठपुरुषि किं स्वपिषि भयं मे समुपस्थितं यदि शक्यमशक्यं वा क्रोधदुर्गे भगवति शमय स्वाहा हूं ह्रीं ओं, वनदुर्गे ह्रीं स्फुर स्फुर प्रस्फुर प्रस्फुर घोरघोरतरतनुरूपे चट चट प्रचट प्रचट कह कह रम रम बन्ध बन्ध घातय घातय हूं फट् विजयाघोरे, ह्रीं पद्मावति स्वाहा पद्मावति, महिषमर्दिनि स्वाहा महिषमर्दिनि, ओं दुर्गे दुर्गे रक्षिणि स्वाहा जयदुर्गे, ओं ह्रीं दुं दुर्गायै स्वाहा, ऐं ह्रीं श्रीं ओं नमो भगवत मातङ्गेश्वरि सर्वस्त्रीपुरुषवशङ्करि सर्वदुष्टमृगवशङ्करि सर्वग्रहवशङ्करि सर्वसत्त्ववशङ्कर सर्वजनमनोहरि सर्वमुखरञ्जिनि सर्वराजवशङ्करि ameya jaywant narvekar सर्वलोकममुं मे वशमानय स्वाहा, राजमातङ्ग उच्छिष्टमातङ्गिनि हूं ह्रीं ओं क्लीं स्वाहा उच्छिष्टमातङ्गि, उच्छिष्टचाण्डालिनि सुमुखि देवि महापिशाचिनि ह्रीं ठः ठः ठः उच्छिष्टचाण्डालिनि, ओं ह्रीं बगलामुखि सर्वदुष्टानां मुखं वाचं स्त म्भय जिह्वां कीलय कीलय बुद्धिं नाशय ह्रीं ओं स्वाहा बगले, ऐं श्रीं ह्रीं क्लीं धनलक्ष्मि ओं ह्रीं ऐं ह्रीं ओं सरस्वत्यै नमः सरस्वति, आ ह्रीं हूं भुवनेश्वरि, ओं ह्रीं श्रीं हूं क्लीं आं अश्वारूढायै फट् फट् स्वाहा अश्वारूढे, ओं ऐं ह्रीं नित्यक्लिन्ने मदद्रवे ऐं ह्रीं स्वाहा नित्यक्लिन्ने । स्त्रीं क्षमकलह्रहसयूं.... (बालाकूट)... (बगलाकूट )... ( त्वरिताकूट) जय भैरवि श्रीं ह्रीं ऐं ब्लूं ग्लौः अं आं इं राजदेवि राजलक्ष्मि ग्लं ग्लां ग्लिं ग्लीं ग्लुं ग्लूं ग्लं ग्लं ग्लू ग्लें ग्लैं ग्लों ग्लौं ग्ल: क्लीं श्रीं श्रीं ऐं ह्रीं क्लीं पौं राजराजेश्वरि ज्वल ज्वल शूलिनि दुष्टग्रहं ग्रस स्वाहा शूलिनि, ह्रीं महाचण्डयोगेश्वरि श्रीं श्रीं श्रीं फट् फट् फट् फट् फट् जय महाचण्ड- योगेश्वरि, श्रीं ह्रीं क्लीं प्लूं ऐं ह्रीं क्लीं पौं क्षीं क्लीं सिद्धिलक्ष्म्यै नमः क्लीं पौं ह्रीं ऐं राज्यसिद्धिलक्ष्मि ओं क्रः हूं आं क्रों स्त्रीं हूं क्षौं ह्रां फट्... ( त्वरिताकूट )... (नक्षत्र- कूट )... सकहलमक्षखवूं ... ( ग्रहकूट )... म्लकहक्षरस्त्री... (काम्यकूट)... यम्लवी... (पार्श्वकूट)... (कामकूट)... ग्लक्षकमहव्यऊं हहव्यकऊं मफ़लहलहखफूं म्लव्य्रवऊं.... (शङ्खकूट )... म्लक्षकसहहूं क्षम्लब्रसहस्हक्षक्लस्त्रीं रक्षलहमसहकब्रूं... (मत्स्यकूट ).... (त्रिशूलकूट)... झसखग्रमऊ हृक्ष्मली ह्रीं ह्रीं हूं क्लीं स्त्रीं ऐं क्रौं छ्री फ्रें क्रीं ग्लक्षक- महव्यऊ हूं अघोरे सिद्धिं मे देहि दापय स्वाअघोरे, ओं नमश्चा ameya jaywant narvekar
HOW I RECOVERED MY $38,000 from coincrypto. tech
ReplyDeleteI’m forever grateful to Jetwebhackers for their remarkable assistance in recovering the $38,540 I had lost to a crypto scam. This amount was meant to cover my husband’s urgent hospital bills, and I was deceived by a fraudster posing as Agent David, who promised me a return of $380,940 – but it was all a scam. Thanks to Jetwebhackers’ expertise and dedication, I was able to recover not only the initial investment but also the profit I was promised. Their help has been a blessing to my family, and we can now focus on my husband’s recovery without financial stress. I highly recommend Jetwebhackers to anyone who has fallen victim to crypto scams. They are professional, efficient, and compassionate. Thank you, Jetwebhackers, for your exceptional service and support during a difficult time!"CONTACT THEM VIA
Reach out to them today and turn your situation around!
EMAIL: jetwebhackers@gmail.com
WhatsApp: +1 (260) 228-9998
#jetwebhackers